

The Sitecore App Marketplace for XM Cloud has officially launched, opening up exciting new possibilities for extending and customizing the platform. This quick start guide consolidates key pieces of the Sitecore documentation to help you get up and running fast.
Whether you’re looking to build internal tools for your organization or create apps for the broader Sitecore community, this guide will have you connected and communicating with XM Cloud in under an hour. We’ll cover the essential steps to register your app, set up the development environment, and establish secure communication with Sitecore.
What You’ll Need
Before diving in, make sure you have:
- Access to Sitecore Cloud Portal – You’ll need an active account with developer permissions
- Development Environment – Node.js 16+, npm 10+, and your favorite code editor
- Basic Web Development Skills – JavaScript/TypeScript, React, and modern web development concepts
Understanding Extension Points
Before creating your app, it’s important to understand where your app can appear in the Sitecore interface:
Standalone
- Appears on the Cloud Portal Home page in the “Marketplace apps” section
- Opens as a full screen under the navigation header
- Accessible outside of XM Cloud environments
- Note: Currently limited to organization admins and owners


XM Cloud Extension Points
If your app extends XM Cloud functionality, you can choose from several integration points:
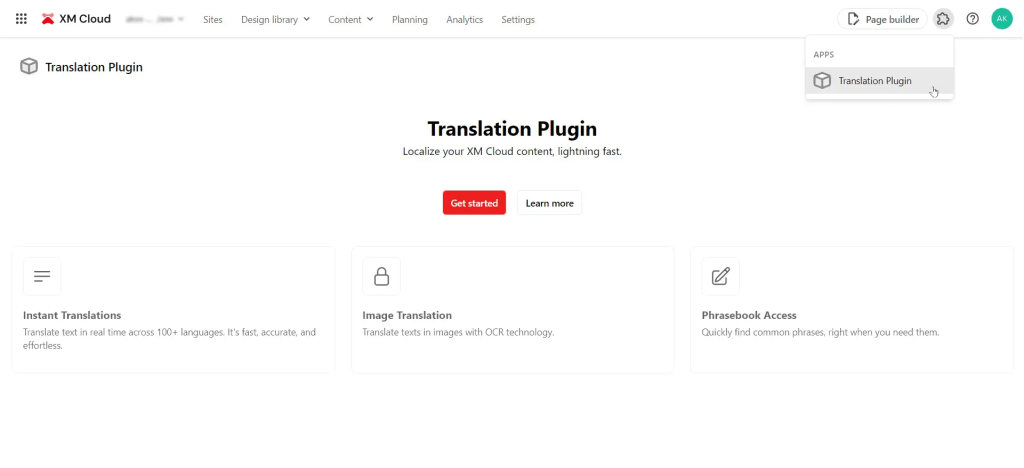
- XM Cloud Full Screen – Listed in the XM Cloud navigation header “Apps” dropdown
- Opens as a full screen under the navigation header
- Ideal for full-page content like home pages or authentication sections
- Page Builder Context Panel – Listed in the XM Cloud Page builder “Apps” dropdown
- Appears in a context panel to the left of the canvas
- Perfect for page-level settings or real-time analytics insights

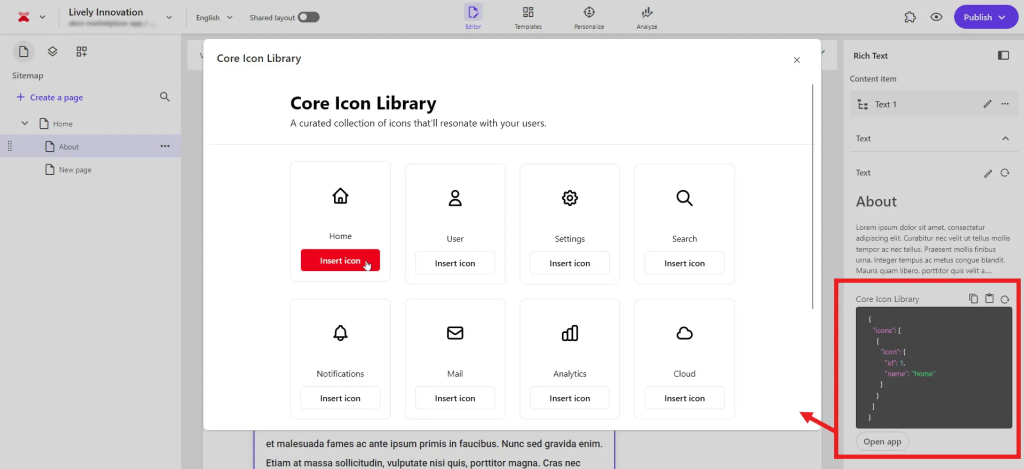
- Page Builder Custom Field – Appears in a modal when users interact with custom fields
- Integrates directly into content items and pages
- Ideal for external data like icon libraries, color pickers, or API-driven content
- Dashboard Widget – Appears as draggable widgets on XM Cloud site dashboards
- Perfect for displaying site-wide performance metrics and analytics
- Great for charts, popular pages lists, and other data visualizations

Each extension point serves different use cases, so choose the one that best fits your app’s functionality.
Step 1: Register Your App in Cloud Portal
Before writing any code, you need to register your app in the Sitecore Cloud Portal:
Create a New App
- Log in to the Cloud Portal – Navigate to your Sitecore Cloud Portal
- Access Developer Studio – On the navigation header, click Developer studio > Create app
- Enter App Details – In the Create app modal:
- Enter a descriptive name for your application (max 50 characters)
- Select Custom as the app type
- Click Create – Your app is now registered and ready for configuration
Configure Your App
After registration, you need to configure your app settings:
- Open App Configuration – In the Cloud Portal, click Developer studio, then select your newly created app
- Select Extension Points – In the Extension points section:
- Choose at least one area where you want your app to appear
- You can select multiple extension points if needed
- For each extension point, review or customize the Route URL (this maps to routes in your app)
- If using multiple instances of the same extension point, customize the Display name
- Configure API Access – In the API access section:
- Select the APIs your app needs to access
- If extending XM Cloud functionality, enable XM Cloud APIs
- You can modify these permissions later as your app evolves
- Set Development URL – In the Deployment URL field:
- For React (Vite) apps:
http://localhost:5173 - For Next.js apps:
http://localhost:3000 - Important: You must start your development server on this exact URL
- For React (Vite) apps:
- Add App Logo – In the App logo URL field:
- Enter a public URL to your app logo (e.g.,
https://my-app.com/logo.svg) - For development, use this temporary logo:
https://cdn-1.webcatalog.io/catalog/sitecore/sitecore-icon.png?v=1731337318728
- Enter a public URL to your app logo (e.g.,
- Note Your App ID – If using custom fields, make note of your Marketplace app ID (required when adding fields to templates)
- Organization Settings – In Organizations:
- Leave other organizations unauthorized for now
- You’ll configure this later when ready to share your app
- Activate Your App – Click Activate > Activate
Your app is now registered and configured! Next, we’ll build the actual application.
Step 2: Set Up Your Development Project
Create a new Next.js or React project:
For Next.js:
npx create-next-app@latest my-marketplace-app
cd my-marketplace-app
For React (Vite):
npm create vite@latest my-marketplace-app
cd my-marketplace-app
Then install the Sitecore Marketplace SDK packages:
npm install @sitecore-marketplace-sdk/client # Required for all Marketplace apps
npm install @sitecore-marketplace-sdk/xmc # Required only if your app uses XM Cloud APIs
Step 3: Create the useMarketplaceClient Hook
Create a custom hook to manage the SDK initialization. In your src folder, create /utils/hooks/useMarketplaceClient.ts:
// utils/hooks/useMarketplaceClient.ts
import { ClientSDK } from "@sitecore-marketplace-sdk/client";
import { useEffect, useState, useCallback, useMemo, useRef } from "react";

export interface MarketplaceClientState {
  client: ClientSDK | null;
  error: Error | null;
  isLoading: boolean;
  isInitialized: boolean;
}

export interface UseMarketplaceClientOptions {
  retryAttempts?: number; // Default: 3
  retryDelay?: number; // Default: 1000ms
  autoInit?: boolean; // Default: true
}

const DEFAULT_OPTIONS: Required<UseMarketplaceClientOptions> = {
  retryAttempts: 3,
  retryDelay: 1000,
  autoInit: true,
};

let client: ClientSDK | undefined = undefined;

async function getMarketplaceClient() {
  if (client) {
    return client;
  }
  const config = {
    target: window.parent,
  };
  client = await ClientSDK.init(config);
  return client;
}

export function useMarketplaceClient(options: UseMarketplaceClientOptions = {}) {
  const opts = useMemo(() => ({ ...DEFAULT_OPTIONS, ...options }), [options]);

  const [state, setState] = useState<MarketplaceClientState>({
    client: null,
    error: null,
    isLoading: false,
    isInitialized: false,
  });

  const isInitializingRef = useRef(false);

  const initializeClient = useCallback(async (attempt = 1): Promise<void> => {
    let shouldProceed = false;
    setState(prev => {
      if (prev.isLoading || prev.isInitialized || isInitializingRef.current) {
        return prev;
      }
      shouldProceed = true;
      isInitializingRef.current = true;
      return { ...prev, isLoading: true, error: null };
    });

    if (!shouldProceed) return;

    try {
      const client = await getMarketplaceClient();
      setState({
        client,
        error: null,
        isLoading: false,
        isInitialized: true,
      });
    } catch (error) {
      if (attempt < opts.retryAttempts) {
        await new Promise(resolve => setTimeout(resolve, opts.retryDelay));
        return initializeClient(attempt + 1);
      }
      setState({
        client: null,
        error: error instanceof Error ? error : new Error('Failed to initialize MarketplaceClient'),
        isLoading: false,
        isInitialized: false,
      });
    } finally {
      isInitializingRef.current = false;
    }
  }, [opts.retryAttempts, opts.retryDelay]);

  useEffect(() => {
    if (opts.autoInit) {
      initializeClient();
    }
    return () => {
      isInitializingRef.current = false;
      setState({
        client: null,
        error: null,
        isLoading: false,
        isInitialized: false,
      });
    };
  }, [opts.autoInit, initializeClient]);

  return useMemo(() => ({
    ...state,
    initialize: initializeClient,
  }), [state, initializeClient]);
}
This hook handles SDK initialization, error states, retry logic, and prevents race conditions.
Step 4: Use the Hook in Your App
In your main app component (like App.tsx or pages/index.tsx), use the hook to connect to Sitecore:
For React (App.tsx):
import { useState, useEffect } from "react";
import type { ApplicationContext } from "@sitecore-marketplace-sdk/client";
import { useMarketplaceClient } from "./utils/hooks/useMarketplaceClient";

function App() {
  const { client, error, isInitialized, isLoading } = useMarketplaceClient();
  const [appContext, setAppContext] = useState<ApplicationContext>();

  useEffect(() => {
    if (!error && isInitialized && client) {
      console.log("Marketplace client initialized successfully.");

      // Make a query to retrieve the application context
      client.query("application.context")
        .then((res) => {
          console.log("Success retrieving application.context:", res.data);
          setAppContext(res.data);
        })
        .catch((error) => {
          console.error("Error retrieving application.context:", error);
        });
    } else if (error) {
      console.error("Error initializing Marketplace client:", error);
    }
  }, [client, error, isInitialized]);

  if (isLoading) {
    return <div>Connecting to XM Cloud...</div>;
  }

  if (error) {
    return <div>Error: {error.message}</div>;
  }

  return (
    <div className="p-4">
      <h1>Welcome to {appContext?.name || 'My Marketplace App'}</h1>
      <p>Successfully connected to Sitecore!</p>
    </div>
  );
}

export default App;
For Next.js (pages/index.tsx):
import { useState, useEffect } from "react";
import type { ApplicationContext } from "@sitecore-marketplace-sdk/client";
import { useMarketplaceClient } from "../utils/hooks/useMarketplaceClient";

export default function Home() {
  const { client, error, isInitialized, isLoading } = useMarketplaceClient();
  const [appContext, setAppContext] = useState<ApplicationContext>();

  useEffect(() => {
    if (!error && isInitialized && client) {
      client.query("application.context")
        .then((res) => {
          setAppContext(res.data);
        })
        .catch((error) => {
          console.error("Error retrieving application.context:", error);
        });
    }
  }, [client, error, isInitialized]);

  if (isLoading) return <div>Loading...</div>;
  if (error) return <div>Error: {error.message}</div>;

  return (
    <div className="p-4">
      <h1>Welcome to {appContext?.name || 'My Marketplace App'}</h1>
    </div>
  );
}
Step 5: Start Development
Start your development server:
npm run dev
Important: Make sure to start your app on the same localhost address that you specified during app configuration in the Sitecore Cloud Portal.
Step 6: Open Your App in Sitecore
Once your app is running:
- Open your Sitecore Cloud Portal in your web browser
- Navigate to the Marketplace section
- Find your registered app and open it in one of its configured extension points
- Your app will now appear embedded in Sitecore with secure communication established
Development Tips:
- Always preview your app in the Sitecore extension point, not just on localhost
- Check the browser console in the Sitecore extension point for logs (not on localhost)
- Any functionality requiring Sitecore communication only works within the extension points
Next Steps
Congratulations! You now have a working Marketplace app connected to XM Cloud. Your app can securely communicate with Sitecore and access the application context.
To continue building your app, you’ll want to explore:
- Making Additional Queries – Retrieve data from Sitecore using
client.query() - Performing Mutations – Trigger actions in Sitecore using
client.mutate() - XM Cloud Integration – Access XM Cloud APIs for content management
- Advanced Extension Points – Leverage different integration points for various use cases
Official Documentation
For detailed information on building more complex functionality, refer to the official Sitecore documentation:
- Introduction to Sitecore Marketplace – Overview of the platform and capabilities
- Sitecore Marketplace SDK for JavaScript – Complete SDK reference and examples
- Understanding Queries – Learn how to retrieve data from Sitecore
- Understanding Mutations – Learn how to trigger actions in Sitecore
The Marketplace SDK opens up incredible possibilities for extending XM Cloud. Start simple, focus on solving real problems for content creators and marketers, and leverage the powerful APIs that XM Cloud provides. The Sitecore developer community is here to help, and we can’t wait to see what you create!
