
Following up on our post from a couple weeks ago is the second part of of Sitecore on Azure PaaS Developer Training Guide. If you haven’t yet taken a look at the first part, I strongly encourage you to do so before jumping into this one.
In this post, we will cover a basic introduction to Azure PaaS App Services, setting up Custom Domains, and Scaling. Next week, in the third (and final) installment, we’ll cover Application Insights and Logging! Now let’s jump into it.
App Services
Azure App Services are the primary service you’ll work with for hosting Sitecore applications on Azure PaaS. It’s a fully managed platform for building, deploying, and scaling web apps.
Understanding App Services for Sitecore
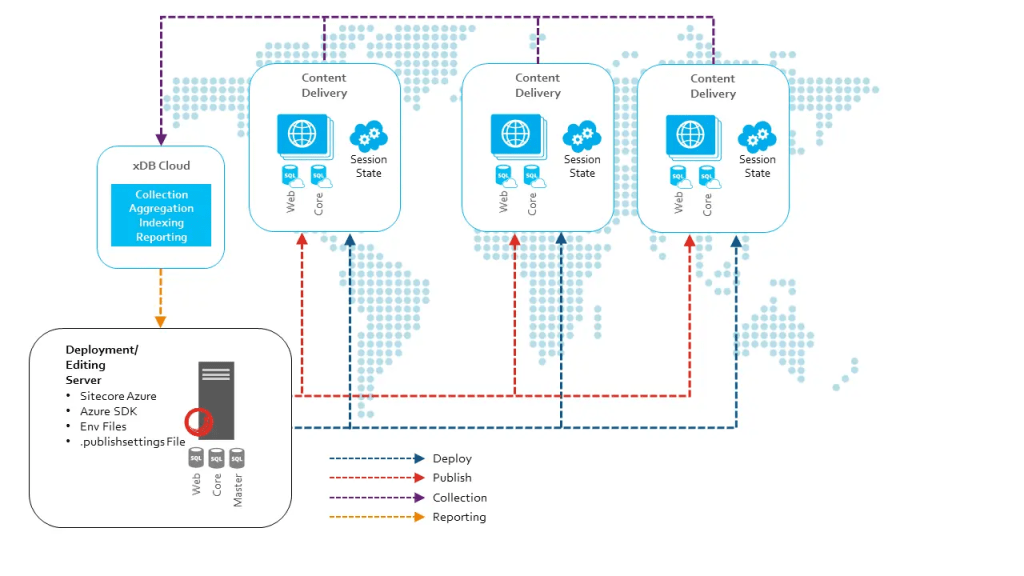
In a typical Sitecore deployment on Azure PaaS, you’ll have multiple App Services, each corresponding to a different Sitecore role:
- Content Management (CM)
- Content Delivery (CD)
- Processing
- Reporting
- Identity Server
Each of these roles is deployed as a separate App Service, allowing for independent scaling and management.
Accessing App Services
- In the Azure Portal, go to your Resource Group
- Look for resources of type “App Service” in the list
- Click on an App Service to access its management blade
Key Features of App Services
1. Deployment Slots
Deployment slots allow you to deploy different versions of your app to different URLs. This is particularly useful for staging environments and A/B testing.
To create a deployment slot:
- In your App Service, go to “Deployment slots” in the left sidebar
- Click “+ Add Slot”
- Give the slot a name (e.g., “staging”) and choose whether to clone settings from another slot
2. Configuration Settings
App settings and connection strings can be managed in the Configuration section:
- In your App Service, go to “Configuration” in the left sidebar
- Here you can manage app specific settings as well as general settings
3. Scaling Options
Azure App Service provides two types of scaling:
- Scale Up (Vertical Scaling): Increase the resources (CPU, RAM) allocated to your app
- Scale Out (Horizontal Scaling): Increase the number of VM instances running your app
To access scaling options:
- In your App Service, go to “Scale up (App Service plan)” for vertical scaling
- Go to “Scale out (App Service plan)” for horizontal scaling
Note: While you may have access to scale up/out a specific App Resource, there are cost implications to doing so. Any chances made here must be approved by the Account Manager, AND the client. If you would prefer, scaling can also be adjusted through a Service Request
For more specific information on scaling, please see Scaling Resources
4. Monitoring and Diagnostics
App Services provide built-in monitoring and diagnostic tools:
- In your App Service, go to “Monitoring” in the left sidebar
- Here you can access options like “Metrics”, “Diagnostic settings”, and “Log stream”
Sitecore-specific Considerations for App Services
- Multiple App Services: Understand how different Sitecore roles are distributed across App Services.
- Configuration: Familiarize yourself with Sitecore-specific app settings and connection strings.
- Scaling: Learn how to scale different Sitecore roles independently based on performance requirements.
- Deployment: Understand the deployment process for Sitecore, including the use of deployment slots for zero-downtime updates.
- WebJobs: Some Sitecore tasks run as WebJobs. These can be managed in the “WebJobs” section of your App Service.
Custom Domains
Setting up custom domains for your Sitecore sites is crucial for all environments. This section will guide you through the process of configuring custom domains for your Sitecore instances on Azure PaaS.
Steps to Assign a Custom Domain
- Prepare Your Domain:
- Decide which Sitecore roles (CM, CD) need custom domains.
- Align with either the client or our Web Ops team on which domains will be assigned to which roles and within which environments.
- Access Custom Domain Settings:
- In the Azure Portal, navigate to your App Service.
- In the left sidebar, under “Settings”, click on “Custom domains”.
- Add Custom Domain:
- Click on “Add custom domain”.
- Enter your domain name (e.g., www.yoursitecoredomain.com).
- Click “Validate”.
- Verify Domain Ownership:
- Azure will provide you with DNS records to add to your domain.
- Provide these records to the client so they can complete DNS configuration.
- Common record types:
- CNAME record for subdomains
- A record for root domains
- Finalize Domain Assignment:
- Once DNS propagation is complete, return to the Azure Portal.
- Click “Add custom domain” to finalize the assignment.
SSL/TLS Certificate Setup
For secure communication, you need to bind an SSL/TLS certificate to your custom domain.
- Obtain an SSL/TLS Certificate:
- Obtain the required SSL Certificate from the client.
- Bind Certificate to Custom Domain:
- In the App Service, go to “TLS/SSL settings”.
- Under “Bring your own certificate”, upload your certificate.
- Bind the certificate to your custom domain.
Sitecore-Specific Considerations
- Multiple Domains:
- Sitecore often requires multiple domains (e.g., CM, CD, Identity Server).
- Repeat the process for each required domain.
- Configuration Updates:
- Update Sitecore configuration to reflect new domain names:
- Update definitions in App_Config/Include/sites.config.
- Or via Sitecore if using SXA
- Modify Content Delivery, Identity Server URLs in CM configuration.
- Update definitions in App_Config/Include/sites.config.
- Update Sitecore configuration to reflect new domain names:
- Link Management:
- Update Sitecore Link Provider settings to use the new domains
Scaling Resources
Azure PaaS allows easy scaling of your Sitecore applications to handle varying loads. This section covers both vertical and horizontal scaling options. Please note: making changes to the scale of any resource needs to be approved by the client. All of these changes will have an impact to the monthly cost of using Azure PaaS.
Vertical Scaling (Scaling Up)
Vertical scaling involves changing the size of your App Service plan to provide more resources.
Steps:
- In the Azure Portal, go to your App Service.
- In the left sidebar, click on “Settings → Scale up (App Service plan)”.
- Choose a larger tier or instance size.
- Click “Apply” to save changes.
Horizontal Scaling (Scaling Out)
Horizontal scaling increases the number of instances running your app.
Steps:
- In your App Service, go to “Scale out (App Service plan)”.
- Choose your scaling method:
- Manual scale: Set a fixed number of instances.
- Custom autoscale: Define rules for automatic scaling.
Sitecore-Specific Scaling Considerations
- Role-Based Scaling:
- Different Sitecore roles (CM, CD, Processing) may require different scaling strategies.
- Typically, CD instances are scaled horizontally, while CM might be scaled vertically.
- Database Scaling:
- Monitor database performance and scale Azure SQL databases as needed.
- Consider using elastic pools for cost-effective database scaling.
- Cache Synchronization:
- When scaling out CD servers, ensure proper cache synchronization is configured.
- Use Azure Redis Cache for shared session state and caching.
- Search Scaling:
- Monitor Azure Search service performance and scale as needed.
- Consider using multiple search replicas for high-availability and performance.
- Media Library Scaling:
- Ensure Azure Blob Storage is configured for media library items.
- CDN integration can help with media delivery performance.
