
Welcome to the first of a three-part series covering Sitecore on Azure PaaS. Coming back after a great week at Sitecore Symposium really got me thinking about Sitecore’s roadmap and everything that lies ahead. While it’s important to look forward, it’s also important to look back and realize not everyone who uses Sitecore is 100% ready to jump into a headless world. Many of Sitecore’s clients are still using Azure PaaS, and that’s perfectly fine! I wanted to put together a quick Developer Training Guide to help anyone in that situation. While my main focus lately has been on Next.js and Vercel, I’ve had plenty of experience hosting on Azure PaaS and want to share as much of that knowledge as I can! Hopefully, you find this blog series helpful if you ever need to do anything with Sitecore and Azure PaaS!
In this post, we will cover a basic introduction to Azure PaaS and Resource Groups. In the following weeks, we’ll dig into some other topics like App Services, App Insights, Kudu, and even some Sitecore-specific considerations. Stay tuned!
Introduction to Azure PaaS
Azure Platform as a Service (PaaS) is a cloud computing model that provides a platform for developers to build, run, and manage applications without the complexity of maintaining the underlying infrastructure. For Sitecore projects, Azure PaaS offers several benefits:
- Simplified infrastructure management
- Automated scaling and load balancing
- Integrated security and compliance features
- Easy integration with other Azure services
Key Components of Azure PaaS for Sitecore
- Compute Services: Azure App Service is the primary compute platform for hosting Sitecore applications.
- Database Services: Azure SQL Database is used for hosting Sitecore’s various databases.
- Storage Services: Azure Blob Storage is utilized for media storage and other content assets.
- Caching Services: Azure Redis Cache is employed for session state management and content caching.
- Search Services: Azure Search (or Azure Cognitive Search) is used for Sitecore’s search functionality.
- Networking Services: Azure Virtual Networks, Load Balancers, and Application Gateways are used to manage network traffic and security.
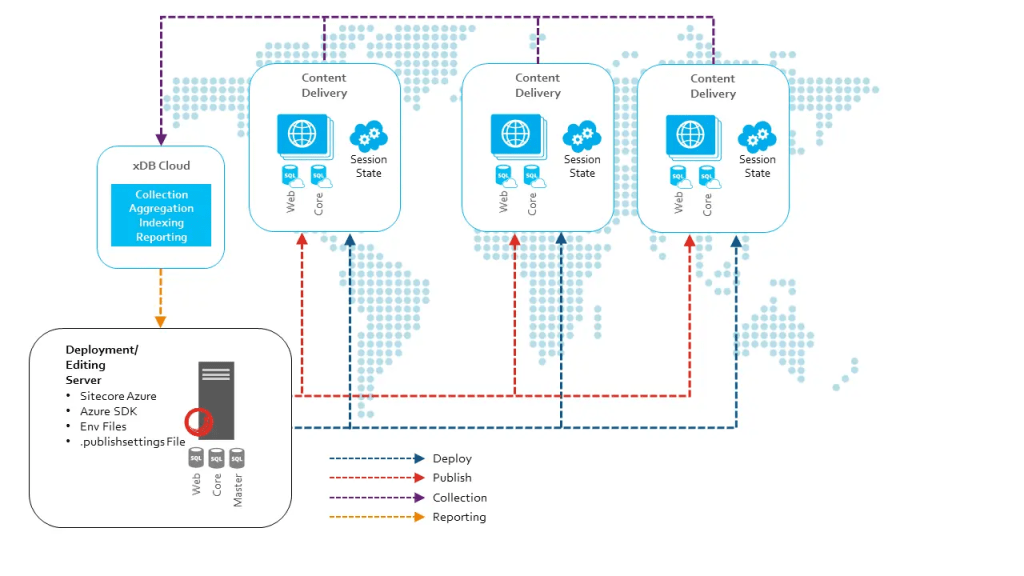
Sitecore on Azure PaaS Architecture
In a typical Sitecore deployment on Azure PaaS, you’ll encounter the following components:
- Content Management (CM) instance
- Content Delivery (CD) instances
- Processing instance
- Reporting instance
- Identity Server instance
- Various databases (Core, Master, Web, Forms, Marketing Automation, etc.)
- Media storage in Blob Storage
- Search indexes in Azure Search
Benefits of Running Sitecore on Azure PaaS
- Scalability: Easily scale your Sitecore instances up or out to handle varying loads.
- High Availability: Built-in load balancing and the ability to deploy across multiple regions ensures high availability.
- Security: Benefit from Azure’s advanced security features and compliance certifications.
- Integrated DevOps: Seamless integration with Azure DevOps for continuous integration and deployment.
- Cost-Effective: Pay only for the resources you use, with the ability to scale down during off-peak hours.
Getting Started with Azure Portal
To begin working with Sitecore on Azure PaaS, you’ll need to familiarize yourself with the Azure Portal.
- Open your web browser and navigate to https://portal.azure.com
- Log in with your Azure credentials
- The top toolbar contains links to all Azure services. You’ll frequently use services like “App Services”, “SQL databases”, and “Storage accounts”.
- The top search bar allows you to quickly find resources or services.
- The top-right corner shows your account information and notifications.
In the next section, we’ll dive deeper into Resource Groups, which are fundamental to organizing your Sitecore resources in Azure.
Resource Groups
What is a Resource Group?
A Resource Group is a logical container for resources deployed on Azure. It helps organize and manage related resources as a single unit. For Sitecore deployments, you typically group all related resources (App Services, databases, storage accounts, etc.) into a single Resource Group.
Key points about Resource Groups:
- All resources in a group share the same lifecycle
- You can apply access control to all resources in a group at once
- You can use Resource Groups to scope your Azure cost reporting
- Resources can interact with other resources in different resource groups
- A resource can only be in one resource group at a time
Accessing Resource Groups
- Log in to the Azure Portal (https://portal.azure.com )
- In the top toolbar, click on “Resource groups”
- You’ll see a list of all Resource Groups in your subscription
- Select the appropriate resource group for your Sitecore project
Key Operations
Adding Resources to a Group
When creating a new resource (like an App Service or SQL Database):
- In the creation form, you’ll see a field for “Resource Group”
- You can either select an existing Resource Group or create a new one
Note: With Sitecore Managed Cloud, adding a new Resource is a pretty rare operation. Most of the time this will be handled by Sitecore Support through a Service Request. If you have any questions about this please reach out to the Web Ops team or the project Architect for more information.
Applying Tags
Tags are name/value pairs that allow you to categorize resources and view consolidated billing by tag.
- In your Resource Group, click on “Tags” in the left menu
- Add key/value pairs for your tags (e.g., “Environment”: “Production”)
- Click “Save” to apply the tags
Setting Up Access Control (IAM)
- In your Resource Group, click on “Access control (IAM)” in the left menu
- Here you can view, add, or remove access to the Resource Group
- Click “+ Add” and then “Add role assignment” to grant access
- Select the appropriate role (e.g., “Contributor” for developers)
- Select the user, group, or service principal to assign the role to
- Click “Save” to apply the changes
Note: With Sitecore Managed Cloud, adjusting Access Controls can be handled by Sitecore Support through a Service Request. If you have any questions about this please reach out to the Web Ops team or the project Architect for more information.
Best Practices for Resource Groups with Sitecore
- Naming Convention: Use a consistent naming convention for your Resource Groups. For example: “rg-sitecorexp-prod-eastus”
- Grouping Strategy: Group resources that share the same lifecycle. For Sitecore, this typically means all resources for a single environment (e.g., production, staging, dev)
- Use Tags: Apply tags to your Resource Group for better organization and cost tracking. Common tags include Environment, Project, Department, etc.
- Access Control: Use Resource Group-level access control to manage permissions efficiently
- Resource Locks: Consider applying resource locks to prevent accidental deletion of critical resources
By mastering Resource Groups, you’ll be able to efficiently organize and manage your Sitecore resources in Azure PaaS. In the next section, we’ll delve into App Services, which is where your Sitecore application instances will actually run.

One response to “Sitecore on Azure PaaS: Developer Training Guide – Part 1”
[…] Sitecore on Azure PaaS: Developer Training Guide – Part 1 […]
LikeLike