

Single Sign-On (SSO) is an authentication process that allows a user to access multiple applications with one set of login credentials. Implementing SSO in Sitecore XM Cloud can enhance user experience and security by integrating with an Identity Provider (IdP). In this post, we’ll walk through the process of setting up SSO in Sitecore XM Cloud and explain the differences between Service Provider (SP) initiated login and Identity Provider (IdP) initiated login.
Prerequisites
Before getting started, ensure you have the following:
- Access to Sitecore XM Cloud.
- An Identity Provider (IdP) such as Oracle Access Manager (OAM), Azure AD, Okta, etc.
- Basic understanding of SAML 2.0 or OpenID Connect (OIDC) protocols.
Steps to Implement SSO with Sitecore XM Cloud
1. Configure the Identity Provider (IdP)
First, configure your IdP to work with Sitecore XM Cloud. This typically involves the following steps:
- Create a new application: Register a new application in your IdP.
- Configure redirect URIs: Set the redirect URIs to match the endpoints in Sitecore XM Cloud.
- Generate certificates: Obtain the necessary certificates for signing and encrypting SAML assertions or JWT tokens.
2. Configure Sitecore XM Cloud
Next, configure Sitecore XM Cloud to trust and interact with your IdP.
- Set up the SSO configuration: In the Sitecore XM Cloud admin panel, navigate to the SSO configuration settings.
- Add SSO Connection: Click on the blue button on the upper right hand corner to create a new SSO connection and select either OpenID Connect or SAML
- When configuring OpenID Connect:
- Configure email domain(s)
- Configure connection type: Front Channel (Implicit Flow) uses response_mode=form_post andresponse_type=id_token.
- Back Channel (Authorization Code Flow) uses response_type=code.
- Provide issuer URL: The URL of the discovery document of the OpenID Connect provider you want to connect with.
- Scopes: Scopes to be requested during authentication.
- Client ID: The client ID of the app created with your identity provider.
- Client Secret: The client secret of the app created with your identity provider. Required if using Back Channel.
- Callback URL: You may need to add this URL (redirect URI) when you register the Sitecore Cloud Portal with your identity provider:
- When configuring SAML:
- Email domain(s)
- Provide IdP metadata: Enter the metadata URL or upload the metadata file provided by your IdP. This metadata includes information about endpoints, certificates, and other necessary configurations.
- Configure claims mapping: Map the claims from your IdP to the corresponding fields in Sitecore XM Cloud. This typically includes user ID, email, and roles.
The Sitecore documentation on configuring either OpenID Connect or SAML based logins is a great place to start if you get stuck anywhere along the setup process:
With setup out of the way, let’s talk a little bit about the different types of login when it comes to SSO
Differences Between SP-Initiated Login and IdP-Initiated Login
SSO can be initiated either by the Service Provider (SP) or the Identity Provider (IdP). Understanding the differences between these methods is crucial for implementing and troubleshooting SSO.
SP-Initiated Login
In an SP-initiated login, the authentication process begins at the Service Provider (Sitecore XM Cloud in this case).
Workflow:
- User attempts to access Sitecore XM Cloud: The user navigates to https://portal.sitecorecloud.io/
- Sitecore XM Cloud redirects to IdP: Sitecore XM Cloud detects that the user is not authenticated and redirects the user to the IdP’s login page.
- User authenticates with IdP: The user enters their credentials on the IdP’s login page.
- IdP redirects back to Sitecore XM Cloud: Upon successful authentication, the IdP sends an authentication response back to Sitecore XM Cloud.
- Sitecore XM Cloud processes the response: Sitecore XM Cloud processes the authentication response, establishes a session for the user, and grants access to the Sitecore Cloud Portal.
Advantages:
- User convenience: Users can directly access the application they want to use.
- Better control: The SP can enforce its own access policies and handle the authentication flow.
IdP-Initiated Login
In an IdP-initiated login, the authentication process begins at the Identity Provider.
Workflow:
- User accesses IdP portal: The user navigates to the IdP’s portal or dashboard.
- User selects Sitecore XM Cloud: From the portal, the user selects Sitecore XM Cloud as the application they want to access.
- IdP authenticates the user: If the user is not already authenticated, the IdP prompts for credentials.
- IdP sends authentication response to Sitecore XM Cloud: Upon successful authentication, the IdP sends an authentication response directly to Sitecore XM Cloud.
- Sitecore XM Cloud processes the response: Sitecore XM Cloud processes the authentication response, establishes a session for the user, and grants access to the application.
Advantages:
- Centralized access: Users can access multiple applications from a single portal.
- Seamless experience: If the user is already authenticated with the IdP, they can access Sitecore XM Cloud without re-entering credentials.
At this point in time, unfortunately IdP-Initiated Login is not supported by XM Cloud.
We attempted to implement IdP-Initiated Login during a recent XM Cloud migration, and were prompted with the following error screen:
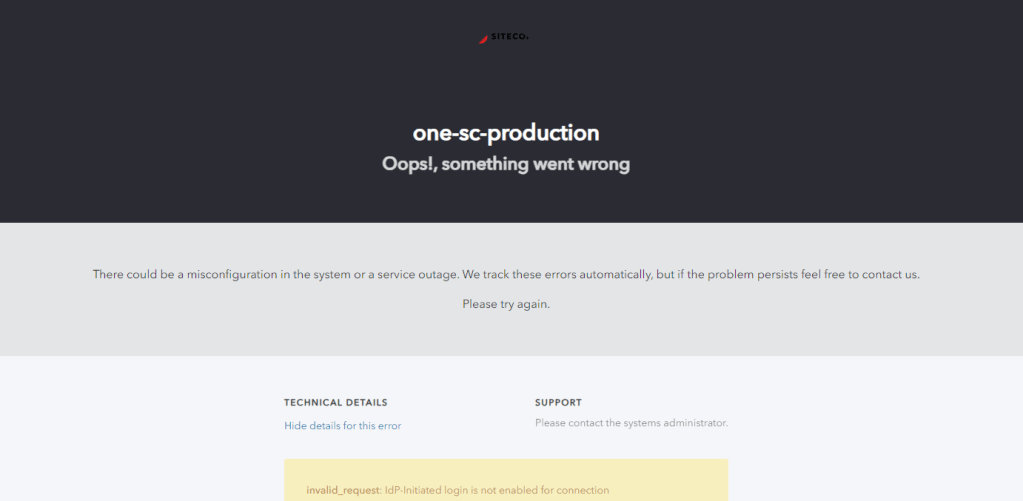
We opened a Sitecore Support ticket to get more information and were informed that
“Unfortunately, the IdP-initiated SSO behavior is not supported in XM Cloud.
IdP-initiated flows carry a security risk and are therefore not recommended.
So, we can only recommend using SP-initiated flows whenever possible.”
Conclusion
Implementing SSO with Sitecore XM Cloud enhances user experience and security by allowing seamless access across multiple applications. By configuring the IdP and Sitecore XM Cloud correctly, and understanding the differences between SP-initiated and IdP-initiated logins, you can ensure a smooth and secure authentication process for your users.
For more detailed documentation and specific configurations, refer to the Sitecore XM Cloud and your IdP’s official documentation.
Feel free to reach out with any questions or comments about implementing SSO with Sitecore XM Cloud!

One response to “Implementing SSO with Sitecore XM Cloud”
[…] https://sitecoresaga.blog/2024/07/10/implementing-sso-with-sitecore-xm-cloud/ […]
LikeLike