
What are Check Checks?
Health Checks are one of the easiest things you can configure within your Azure App Services to help with the stability of your application, and the good news is, starting with Sitecore 9.3 – most of the work is done for us!

This blog post is aimed at how to utilize the Health Check feature within the Azure portal for monitoring your App Service instances. By implementing Health Check, you enhance the availability of your application through the redirection of requests from unhealthy instances. Additionally, if instances continue to exhibit issues, Health Check will automatically replace them. This is done through a periodic ping to a selected path within your web application.
How do Health Checks do what they do?
- When a path within your application is provided, Health Check initiates pings to this path across all instances of your App Service app, occurring at intervals of 1 minute.
- Should an instance fail to provide a status code falling within the range of 200-299 (inclusive) for 10 consecutive requests, App Service identifies it as unhealthy and eliminates it from the load balancer linked to the Web App. The threshold for the count of failed requests necessary to declare an instance as unhealthy can be configured, with a minimum of two requests.
- Following its removal, Health Check continues to periodically ping the unhealthy instance. If this instance begins to respond with a status code indicating good health (within the range of 200-299), it is reinstated into the load balancer’s rotation.
- In cases where an instance remains in an unhealthy state for an hour, it is replaced with a fresh instance to ensure continued stability.
- During the scaling-out process, App Service conducts Health Check pings on the designated path to ascertain the readiness of new instances.
Ok, so how do we enable them?
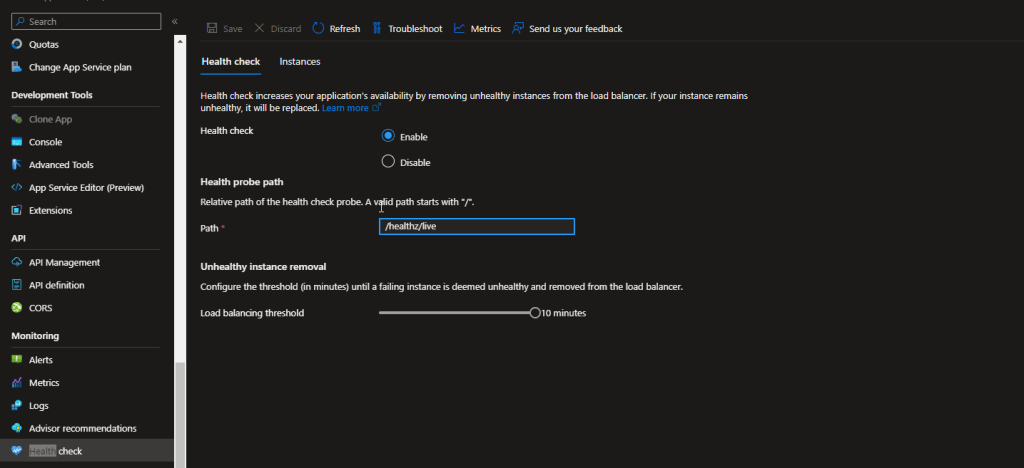
- To enable Health check, browse to the Azure portal and select your App Service app.
- Under Monitoring, select Health check.
- Select Enable and provide a valid URL path on your application. As I mentioned before, starting with 9.3, Sitecore has already given us a path to utilize for this! Set this value to “/healthz/live”
- Select Save.
Note:
- Your App Service plan should be scaled to two or more instances to fully utilize Health check.
Warning:
- These changes will restart your app. To minimize impact to production apps, make these changes to a staging slot first and swap it with production!
Are there any “gotchas” I should look out for?
Yes! As a matter of fact, even though most of the legwork here is done for us by Sitecore, there are a couple of things to be cognizant of while setting up Health Checks.
Instances Showing as Unhealthy – 403

When you first configure your health check, you may notice that all of your instances are showing unhealthy. Seeing thing, you probably navigated to your site and noticed the /healthz/live path is pulling up fine – so what gives?
First things first, check the logs! If you click “Troubleshoot” at the top – you’ll be brought to a list of all status codes returned by the Health Check. Do you notice any 403s?
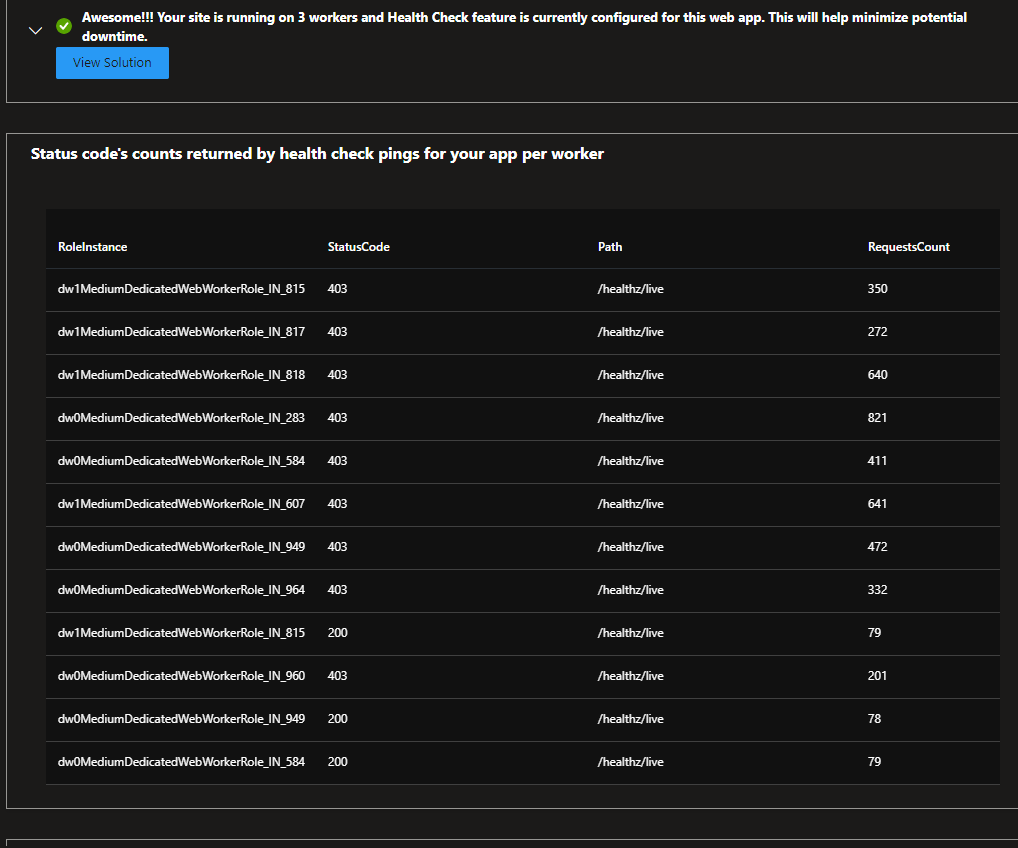
If you do, there could be a few things going on…
- IP Restrictions! If you have IP restrictions enabled on your app, double check and make sure Azure itself is able to access the app. This could be blocking your Health Check!
- “HTTPS Only”. This one hung us up for longer than I care to admit. According to Microsoft documentation, “HTTPS Only” mode MUST be enabled under Configuration -> General Settings on your app service. If it is not, you will get a 403 status code for all of your health checks. A HUGE shoutout to Sitecore Support for helping me get past this one.

Resources:
https://learn.microsoft.com/en-us/azure/app-service/monitor-instances-health-check?tabs=dotnet
